How to replace the `rootViewController` of the `UIWindow` in iOS
Approximately 11’ minutes reading time
This is an advanced topic. It requires extensive background knowledge and experience. Unless you feel confident with what’s being discussed here, consider and be mindful of intricacies and unknown unknowns when implementing presentation transitions, state preservation and restoration on iOS.
Errata
18 February 2019, commit “7d3cccf”
- The
RootViewControllerhad its Container View as a subview rather than being the view. Though technically is allowed, in this case it is not a requirement. - The
RootViewController.viewDidLayoutSubviews()used to callself.transition(from:to:)which in certain layouts it leads to an unwanted animation. Instead, it now usesself.switch(source:destination:)to position its child view controller.
Table of Contents
Introduction
Have you ever needed to build an app that:
- expects the user to go through a lengthy registration process then land on a “home screen”?
- has an extensive tutorial that the user can go through before they start using the app?
- goes through a series of on boarding screens, possibly keeping track of user progress?

In the above example, once the user has gone through registration, you want to discard every view controller involved in the sequence as well as replacing the rootViewController with a new UIViewController that comes after registration.
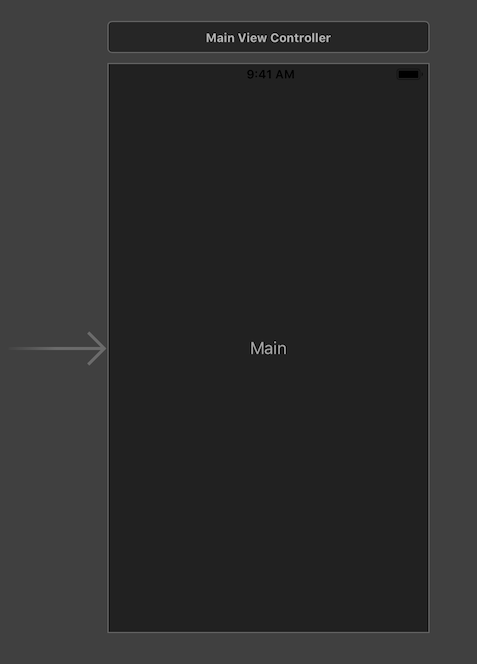
Notice how there is no use case where the user can navigate back to registration. There is no “Back” or “Dismiss” button in the MainViewController that can act as the root. For that reason, you should consider it best practise to discard any UIViewControllers and their respective views so as to bring overall memory usage down and establish a new baseline when a user has registered.
View Controllers’ Presentation and transitions
Let’s start with firing a Notification when the user selects “Done”.
class DoneViewController: UIViewController {

	static let NotificationDone = NSNotification.Name(rawValue: "Done")

	@IBAction func didTouchUpInsideDone(_ sender: Any) {
		NotificationCenter.default.post(name: DoneViewController.NotificationDone, object: nil)
	}
}
Since the AppDelegate holds a reference to the UIWindow and by extension the rootViewController, it can act as an observer. Upon firing, it merely sets the rootViewController property to the new one.
func application(_ application: UIApplication, didFinishLaunchingWithOptions launchOptions: [UIApplication.LaunchOptionsKey: Any]?) -> Bool {

	NotificationCenter.default.addObserver(self, selector:#selector(done(notification:)),name:DoneViewController.NotificationDone,object: nil)

	return true
}

@objc func done(notification: Notification) {
	let storyboard = UIStoryboard(name: "Main", bundle: Bundle(for: type(of: self)))
	self.window?.rootViewController = storyboard.instantiateInitialViewController()
}
Let’s see how that looks.
Notice how there is no transition between the DoneViewController and the MainViewController. This plays a far more important role that it currently seems as you’ll see later. Let’s peak behind the scenes on the view hierarchy.
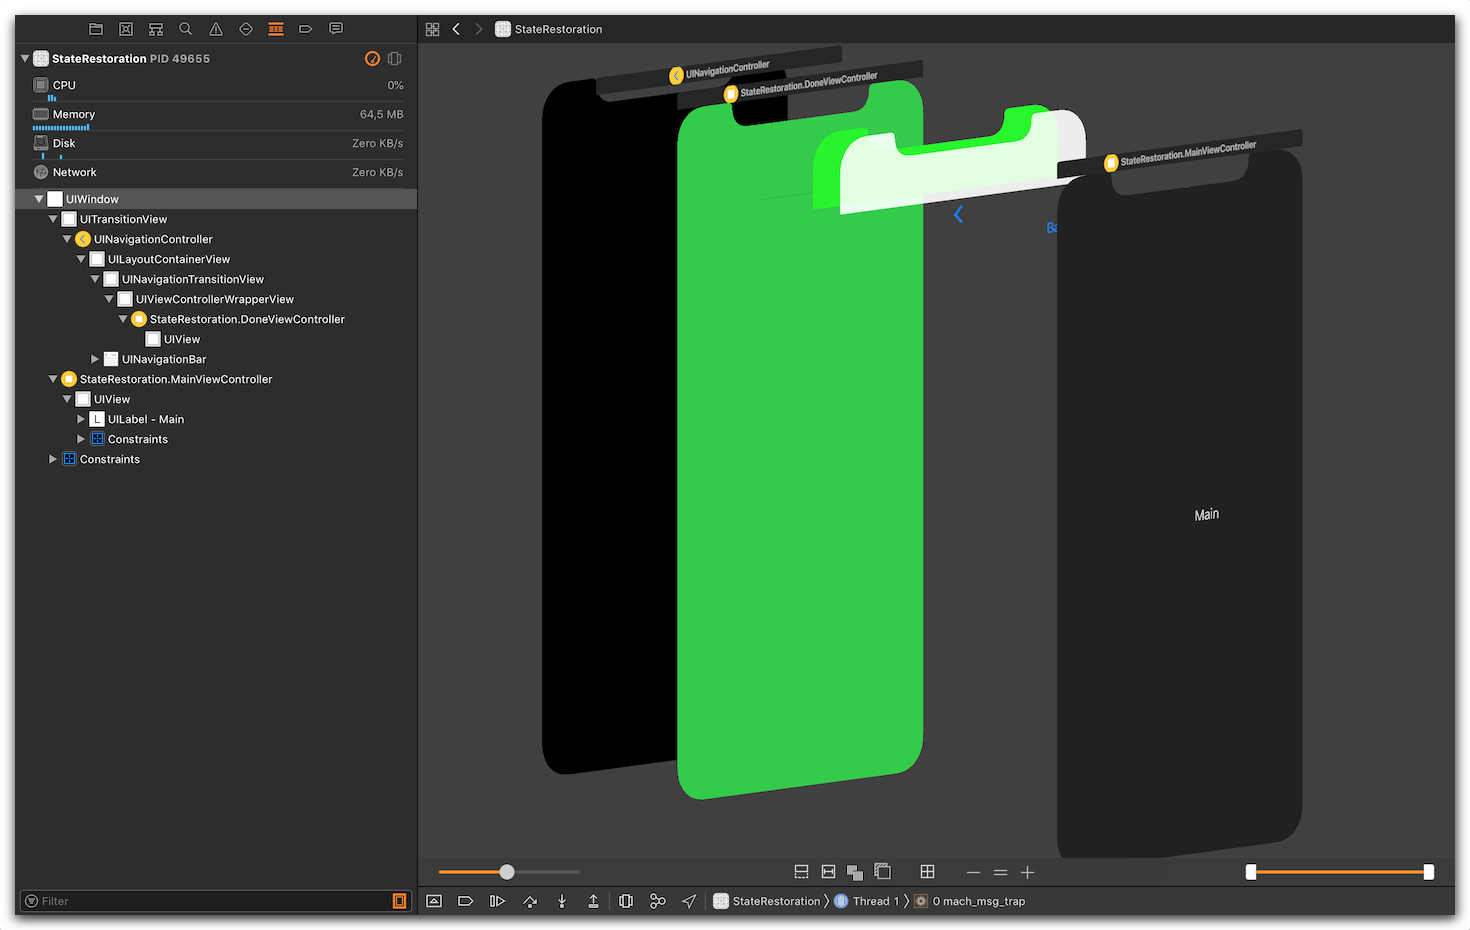
Even though the code replaces the rootViewController for the window, notice how the DoneViewController is still in the view hierarchy under a UITransitionView seemingly owned by the UIWindow. Here is a close look at the memory graph.
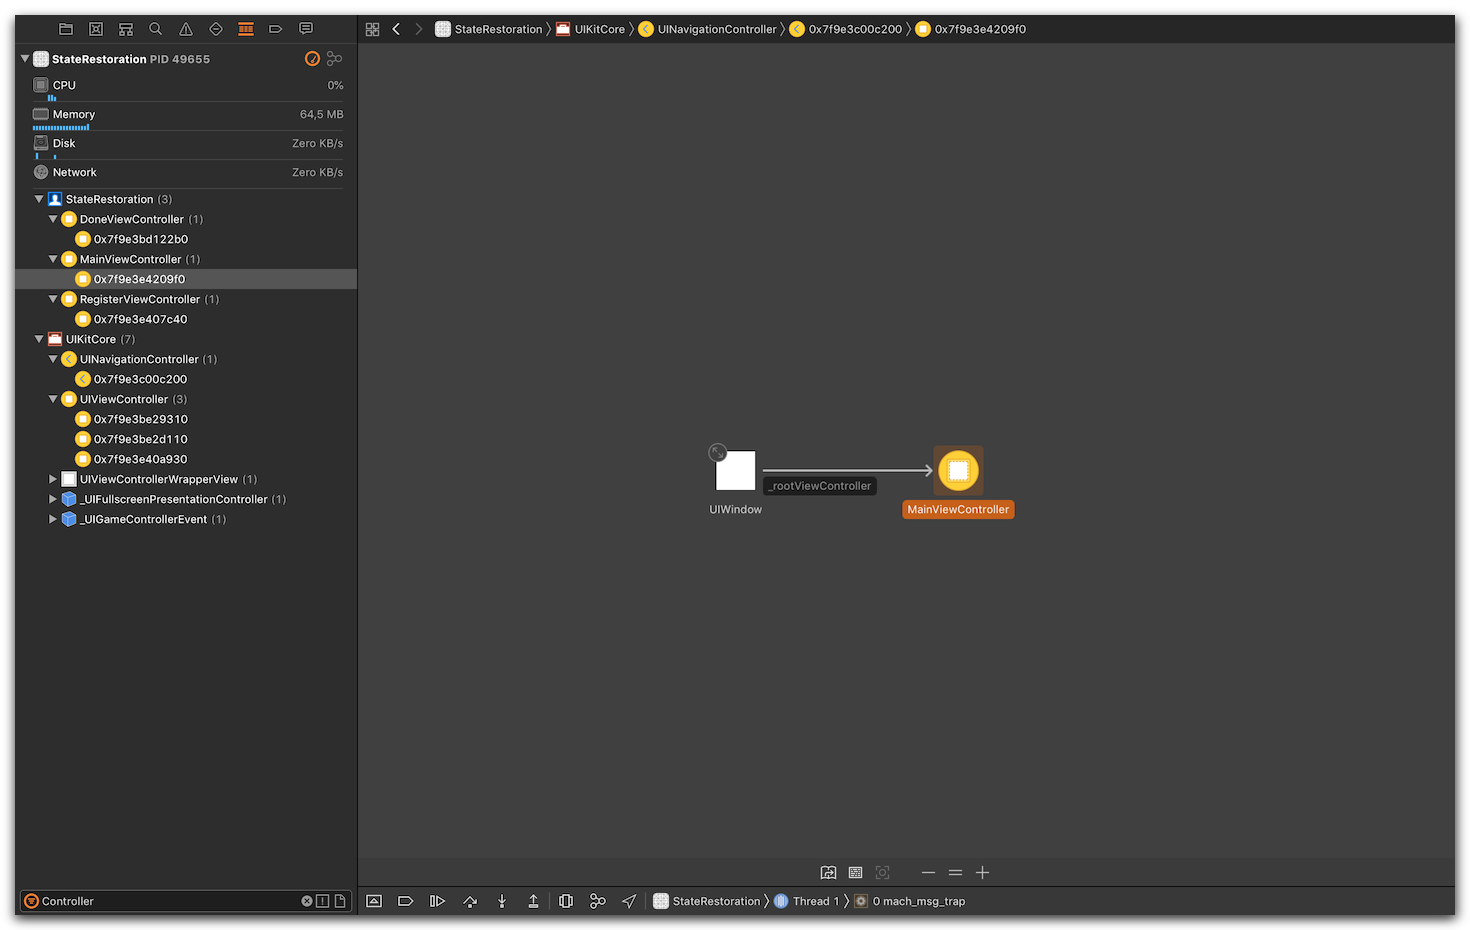
It looks like the RegisterViewController and all of its children are still very much present. Let’s try something else now. Before replacing the rootViewController, use a presentation transition to present the view controller we are interested in.
@objc func done(notification: Notification) {
    let storyboard = UIStoryboard(name: "Main", bundle: Bundle(for: type(of: self)))

    guard let viewController = storyboard.instantiateInitialViewController() else {
        return
    }

    let presentedViewController = self.window?.rootViewController?.presentedViewController

    presentedViewController?.present(viewController, animated: true) {
        self.window?.rootViewController = viewController
    }
}
From UIViewController.present(_:animated:completion:), emphasis mine.
In a horizontally regular environment, the view controller is presented in the style specified by the modalPresentationStyle property. In a horizontally compact environment, the view controller is presented full screen by default.
Since an iPhone, in portrait, is a horizontally compact environment, “the views belonging to the presenting view controller are removed after the presentation completes.” In this case, the presentedViewController (i.e. the DoneViewController) becomes the presentingViewController to the MainViewController, hence the DoneViewController will be removed from the view hierarchy.
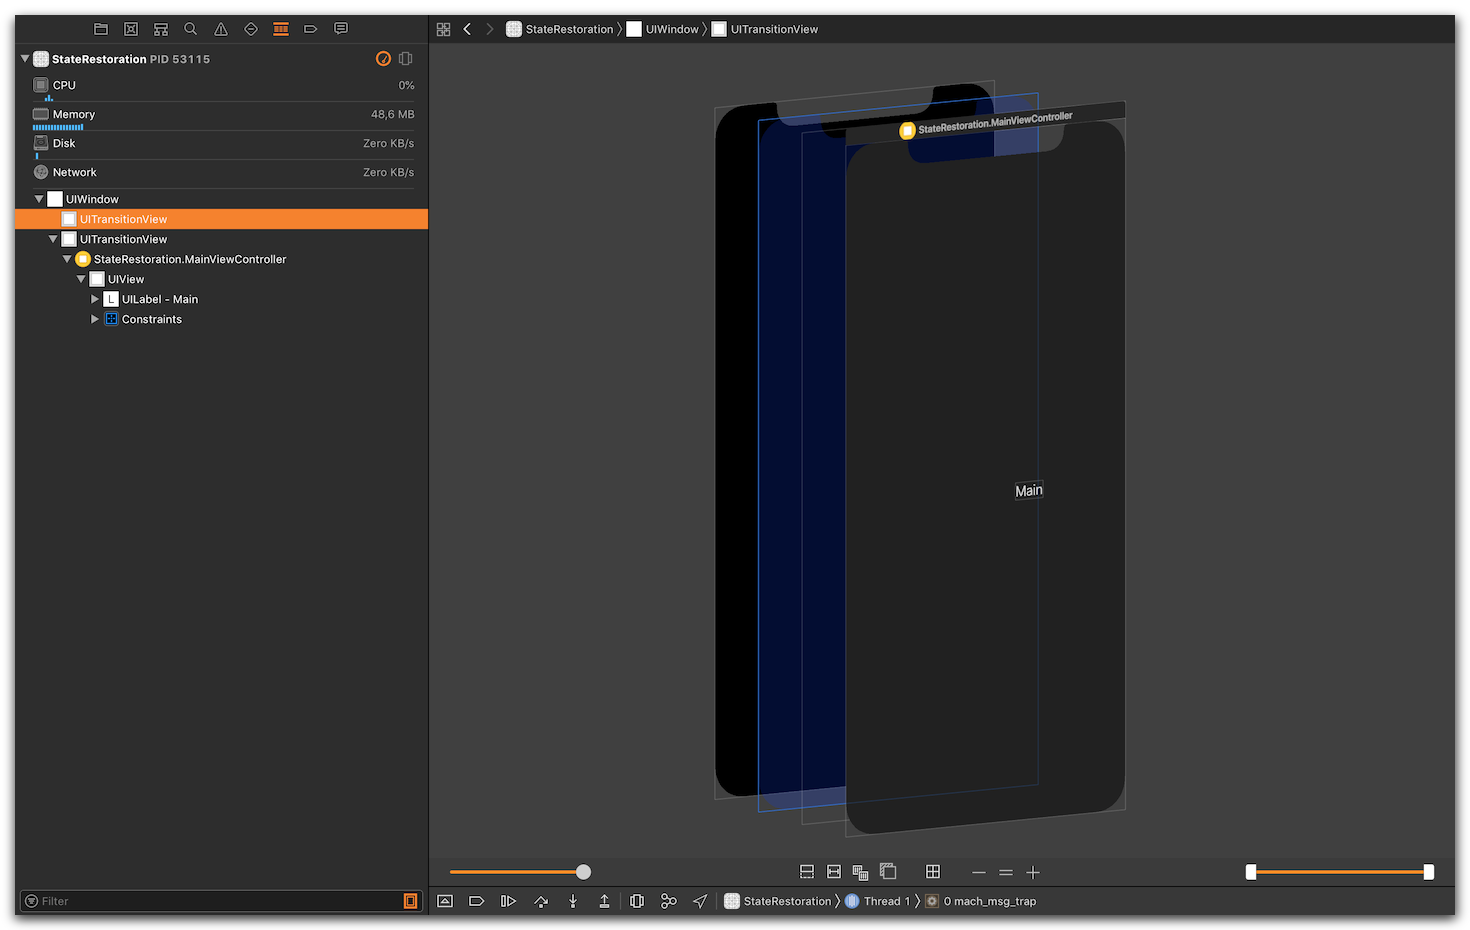
The view hierarchy indeed shows only the MainViewController present. Still, the UITransitionView should give you a clue as to what to expect in the memory graph.
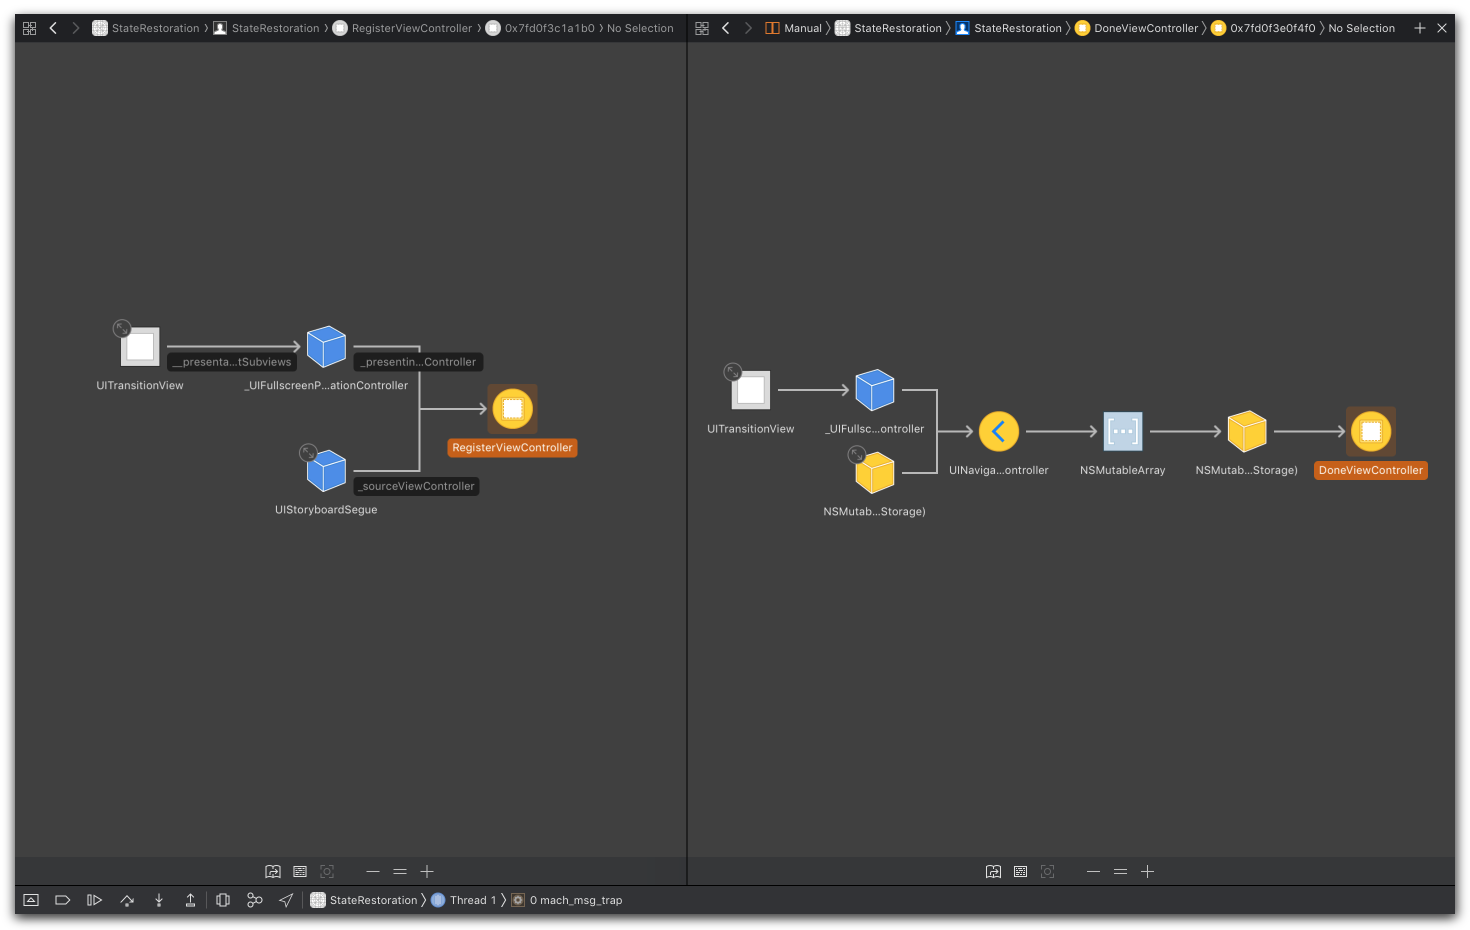
The DoneViewContoller is still very much allocated. The RegisterViewController as well as all of the UIViewController instances are also allocated (not seen in the screenshot). Finally, let’s dismiss the whole view hierarchy, as part of presenting the MainViewController, before replacing the rootViewController.
From UIViewController.dismiss(animated:completion:), emphasis mine.
If you present several view controllers in succession, thus building a stack of presented view controllers, calling this method on a view controller lower in the stack dismisses its immediate child view controller and all view controllers above that child on the stack.
@objc func done(notification: Notification) {
    let storyboard = UIStoryboard(name: "Main", bundle: Bundle(for: type(of: self)))

    guard let viewController = storyboard.instantiateInitialViewController() else {
        return
    }

    let presentedViewController = self.window?.rootViewController?.presentedViewController

    presentedViewController?.present(viewController, animated: true) {
        self.window?.rootViewController?.dismiss(animated: false) {
            self.window?.rootViewController = viewController
        }
    }
}
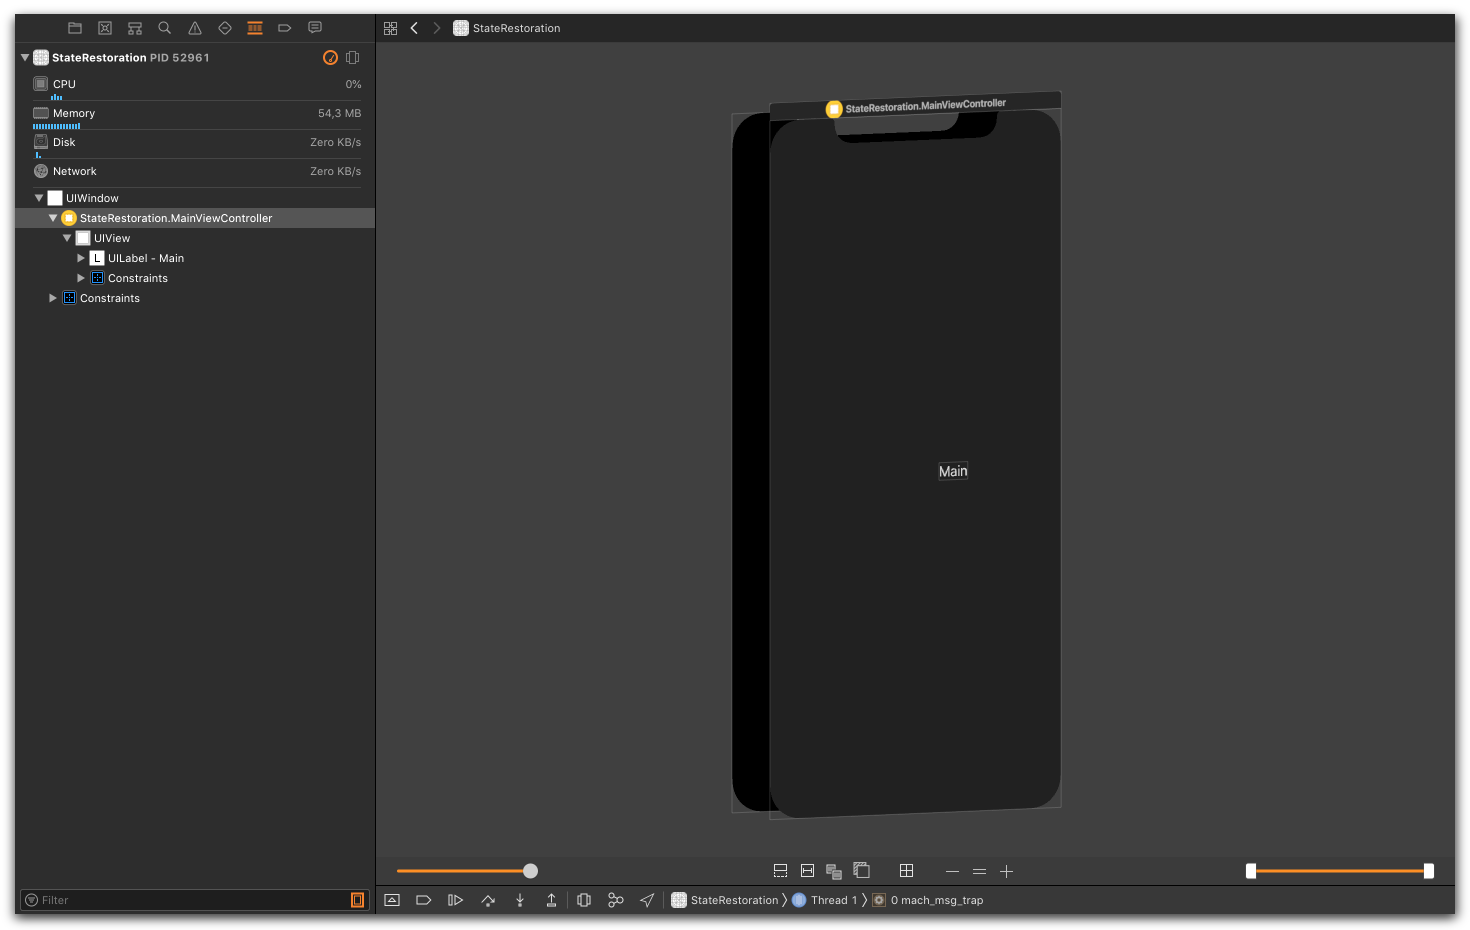
Here is the view hierarchy; no UITransitionView in the window.
And here is the memory graph.
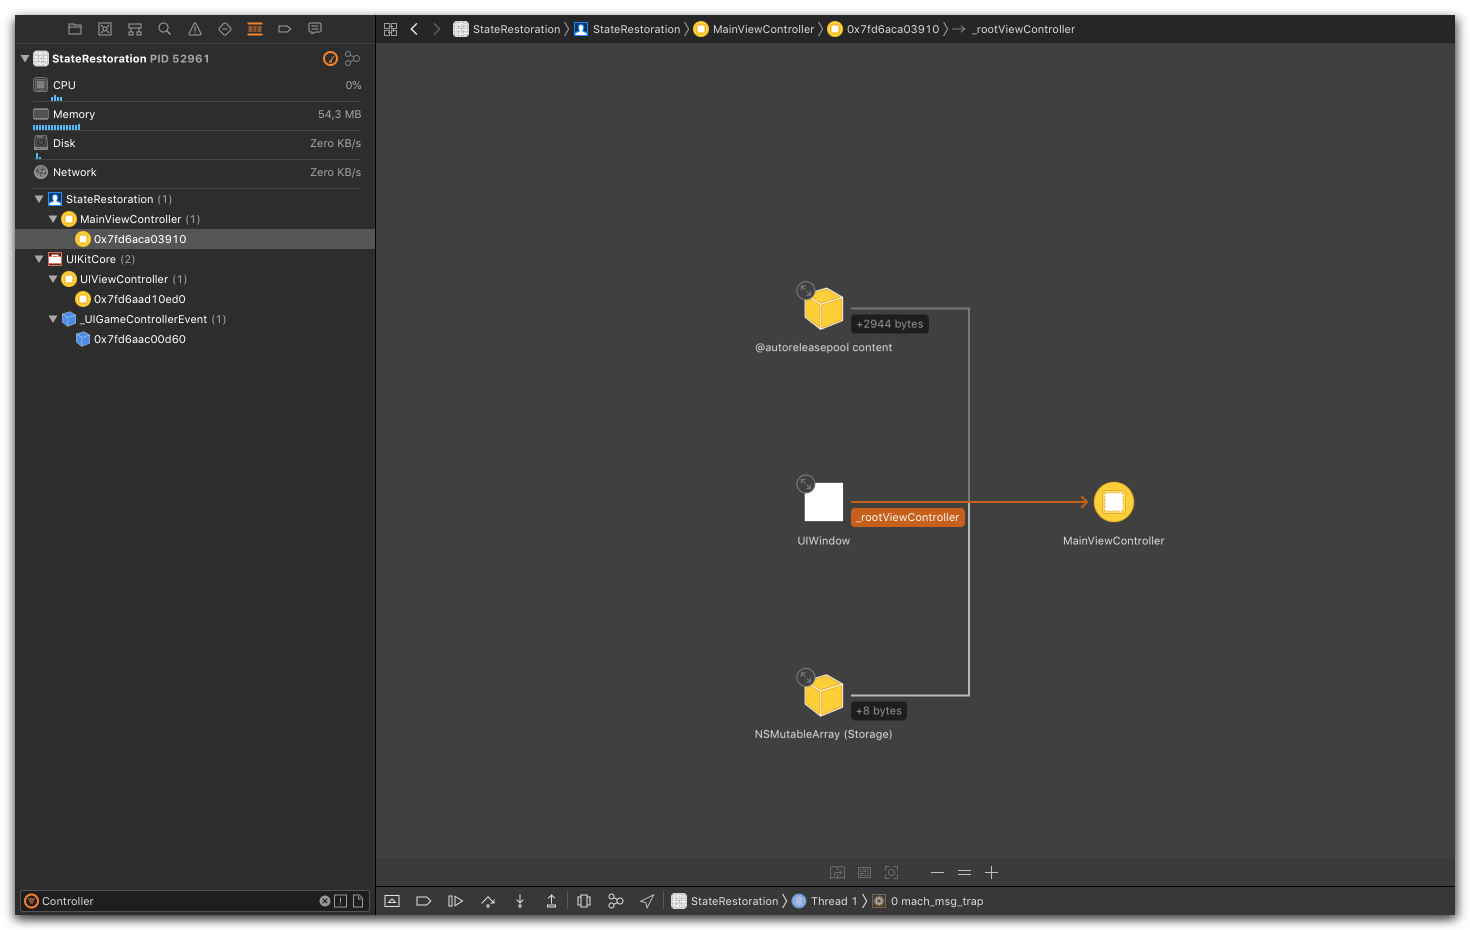
Well, that looks promising. Let’s see how it looks. The video on the right gives you a freeze frame.
What’s happening here? In an effort to remove every UIViewController from the view hierarchy and memory graph, the code completely ignores the presentation. The present and dismiss calls are happening independently and on separate transition contexts.
Let’s break it down.
- The
DoneViewControlleris presenting, modally, theMainViewController. At the end, theDoneViewControlleris removed from the view hierarchy and deallocated. - The
rootViewController(i.e.RegisterViewController) dismisses theUINavigationControllerall the way to the just presentedMainViewController, which takes us back to the initial state where theUIWindowis showing theRegisterViewController. - The
RegisterViewControlleris being replaced by theMainViewControlleras therootViewController.
State Preservation and Restoration
Before looking into how to best replace the rootViewController there is one more thing to consider.
Up until now, we’ve only been talking about replacing the rootViewController and its descendants as part of an “initial” launch. As long as the app isn’t terminated, upon switching to it, its view will be restored. Still, the change in the view hierarchy is not permanent. As soon as the app is terminated by iOS due to memory pressure, the next time the user launches the app, the rootViewController will revert to RegisterViewController as if it was launched for the first time.
This is where state preservation and restoration feature comes in. One thing to keep in mind is that every ancestor UIViewController, including the one whose state you want preserved and restored must have its restorationIdentifier set.
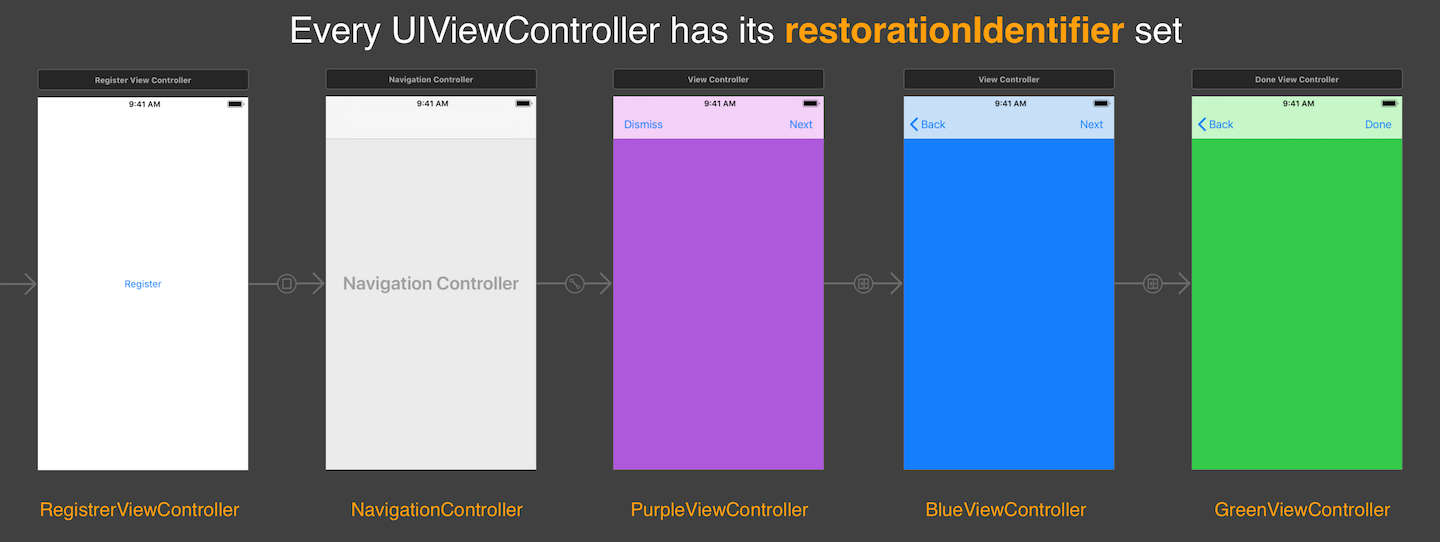
The simplest way to test preservation and restoration is via Xcode. Launch the app, navigate to the view controller with a restorationIdentifier to preserve. Then:
- Put the app into the background
- Stop the app’s execution by pressing the stop button in Xcode
- Launch the app
What you can’t see from the video is that shortly after I put the app in the background, I stop the execution via Xcode. Effectively the app is now considered to be terminated by iOS.
That looks good. Let’s try it on the MainViewController now.
You can briefly see the snapshot of the MainViewController that was taken just before the app moved to the background. Followed by the “Initial UI”.
Obviously the state preservation and restoration isn’t working as expected. I haven’t been able to gather enough information so I am only guessing that state preservation and restoration is coupled to the presentation and transition context. In other words, it’s not enough to simply set a new rootViewController and expect it to be restored. Whatever UIViewController to be restored possibly needs to be a descendant of the “Initial UI”. If you do know more, I would very much like to hear from you.
Container View Controller
With what I know and can see so far, it appears that once the rootViewController has been set, UIKit does not provide for a way to replace it. As such, any presentation and transitions must originate from the rootViewController itself.
A Container View Controller is merely a UIViewController that introduces (or rather exposes) the concept of “child” view controllers. We came across the concept of a child view controller during presenting and dismissing view controllers.
Container view controllers are most often used to facilitate navigation and to create new user interface types based on existing content. In almost every way, a container view controller is like any other content view controller in that it manages a root view and some content.
One way to think about a container view controller is how a UITabBarController manages the presentation of the view for each UIViewController set in its viewControllers property. Every time you select a tab, the corresponding view appears into the window’s bounds and the control is passed to its respective UIViewController.
Thinking back to what we were set out to do. We want to bring into the window the view of another view controller while replacing an existing stack of view controllers. Which sounds awfully lot like how a UITabBarController behaves.

With the container view controller now acting as the root, the view of the RegisterViewController effectively is embedded in the view of the RootViewController. Visually, nothing has changed.
Now that a UIViewController manages the view hierarchy presented, we can replace notifications in favour of an unwind segue. Nothing to see in the DoneViewController. The unwind segue is defined in the storyboard.
class DoneViewController: UIViewController {

}
The AppDelegate has all of the code related to the notification removed. Here is the code for the RootViewController.
class RootViewController: UIViewController {

private func transition(from: UIViewController, to: UIViewController) {
    from.willMove(toParent: nil)
    self.addChild(to)

    self.transition(from: from, to: to, duration: self.transitionCoordinator?.transitionDuration ?? 0.4, options: [], animations: {

    }) { (finished) in
        from.removeFromParent()
        to.didMove(toParent: self)
    }
}

@IBAction func unwindToRootViewController(_ segue: UIStoryboardSegue) {

	let storyboard = UIStoryboard(name: "Main", bundle: Bundle(for: type(of: self)))

	if let registerViewController = self.children.first(where: { $0 is RegisterViewController }), let mainViewController = storyboard.instantiateInitialViewController() {
	self.transition(from: registerViewController, to: mainViewController)
	}
}
Let’s see it in action.
Note that as part of the transition, the DoneViewController is effectively dismissed. Hence the animation that “presents” the MainViewController is the same as if the call was mainViewController.dismiss(animated: true) while the DoneViewController was presented.
The respective view hierarchy and memory graph
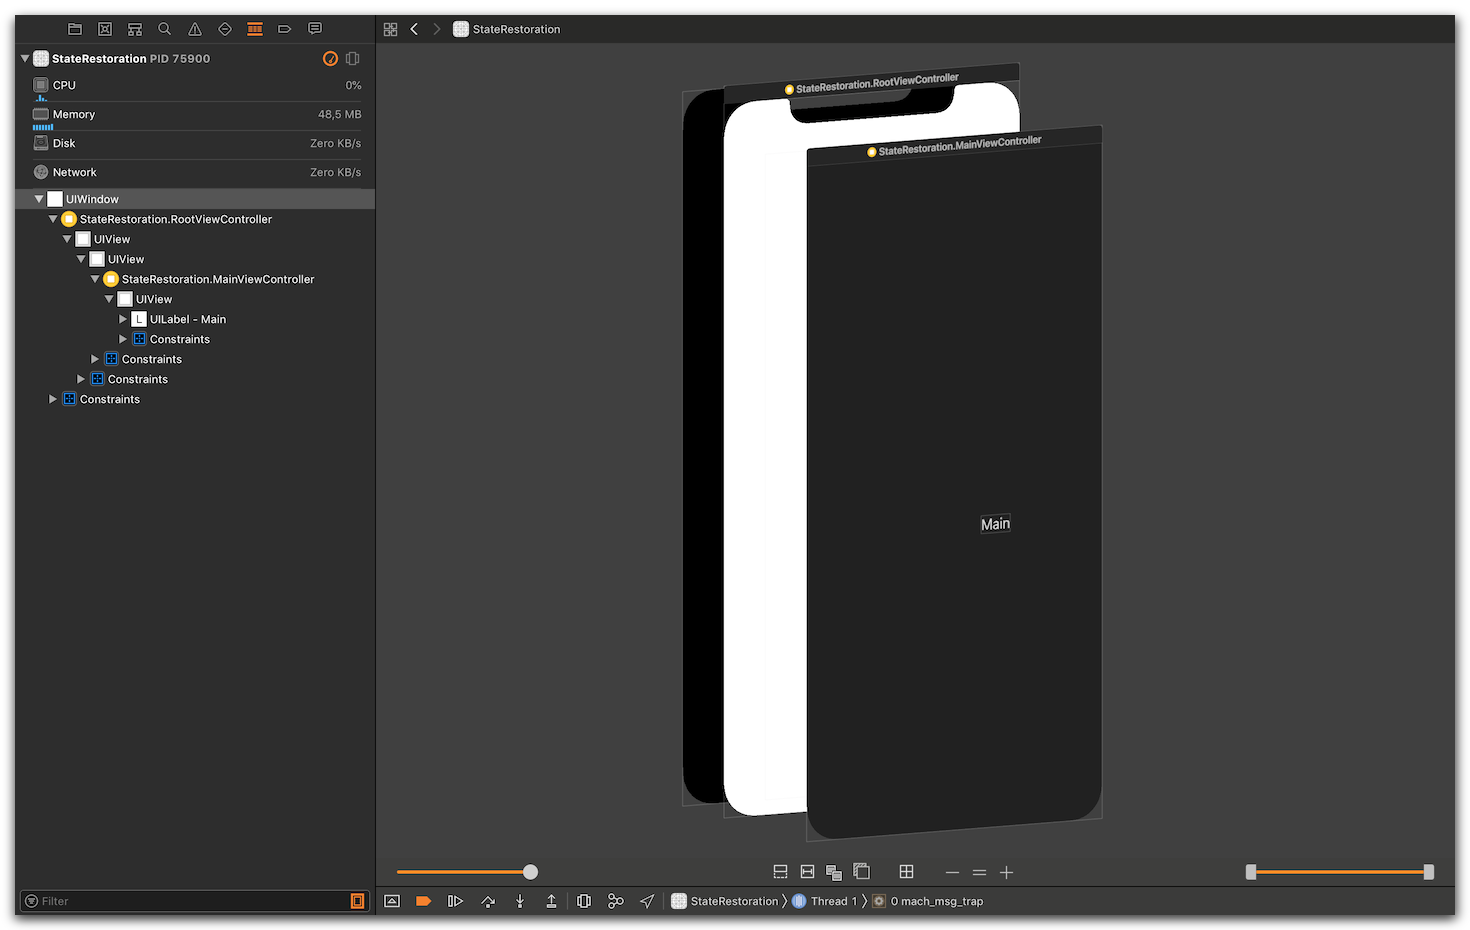
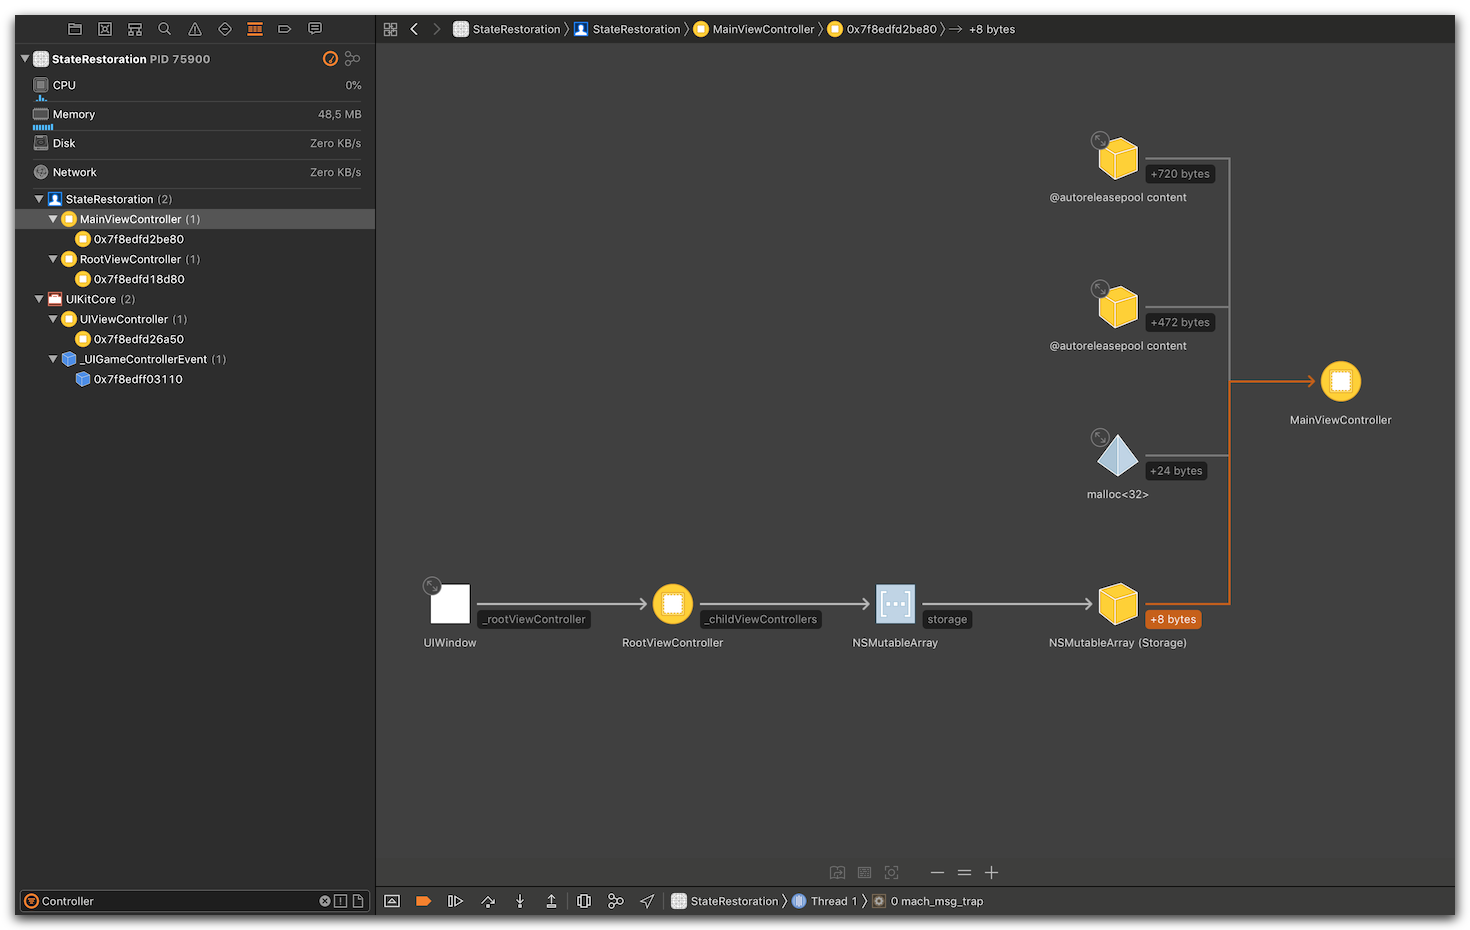
How about state preservation and restoration.
One thing to keep in mind when preserving a UIViewController that acts as the container, is that your code is responsible for saving any references to its child view controllers. Here is what it looks like.
override func encodeRestorableState(with coder: NSCoder) {
    super.encodeRestorableState(with: coder)

    self.children.forEach { child in
        if let restorationIdentifier = child.restorationIdentifier {
            coder.encode(child, forKey: restorationIdentifier)
        }
    }
}

override func decodeRestorableState(with coder: NSCoder) {
    super.decodeRestorableState(with: coder)

    if let mainViewController = coder.decodeObject(of: [MainViewController.self], forKey: "MainViewController") as? MainViewController {
        self.addChild(mainViewController)
    }
}
When the RootViewController is instantiated as part of the “Initial UI”, the RegisterViewController will also be present in its “children” property. Therefore as part of the layout, we need to make sure the MainViewController is the only one in the view hierarchy.
override func viewDidLayoutSubviews() {
    let registerViewController = self.children.first(where: { $0 is RegisterViewController })
    let mainViewController = self.children.first(where: { $0 is MainViewController })

    switch (registerViewController, mainViewController) {
    case (let registerViewController?, let mainViewController?):
        self.switch(source: registerViewController, destination: mainViewController)
    default:
        break
    }

    super.viewDidLayoutSubviews()
}

private func `switch`(source: UIViewController, destination: UIViewController) {

    source.willMove(toParent: nil)

    destination.view.frame = self.view.bounds
    self.view.addSubview(destination.view)

    source.view.removeFromSuperview()
    source.removeFromParent()

    destination.didMove(toParent: self)
}
This time, the MainViewController is restored as expected.
For completeness, here are the visual hierarchy and memory graph of the app after the restore process is done.
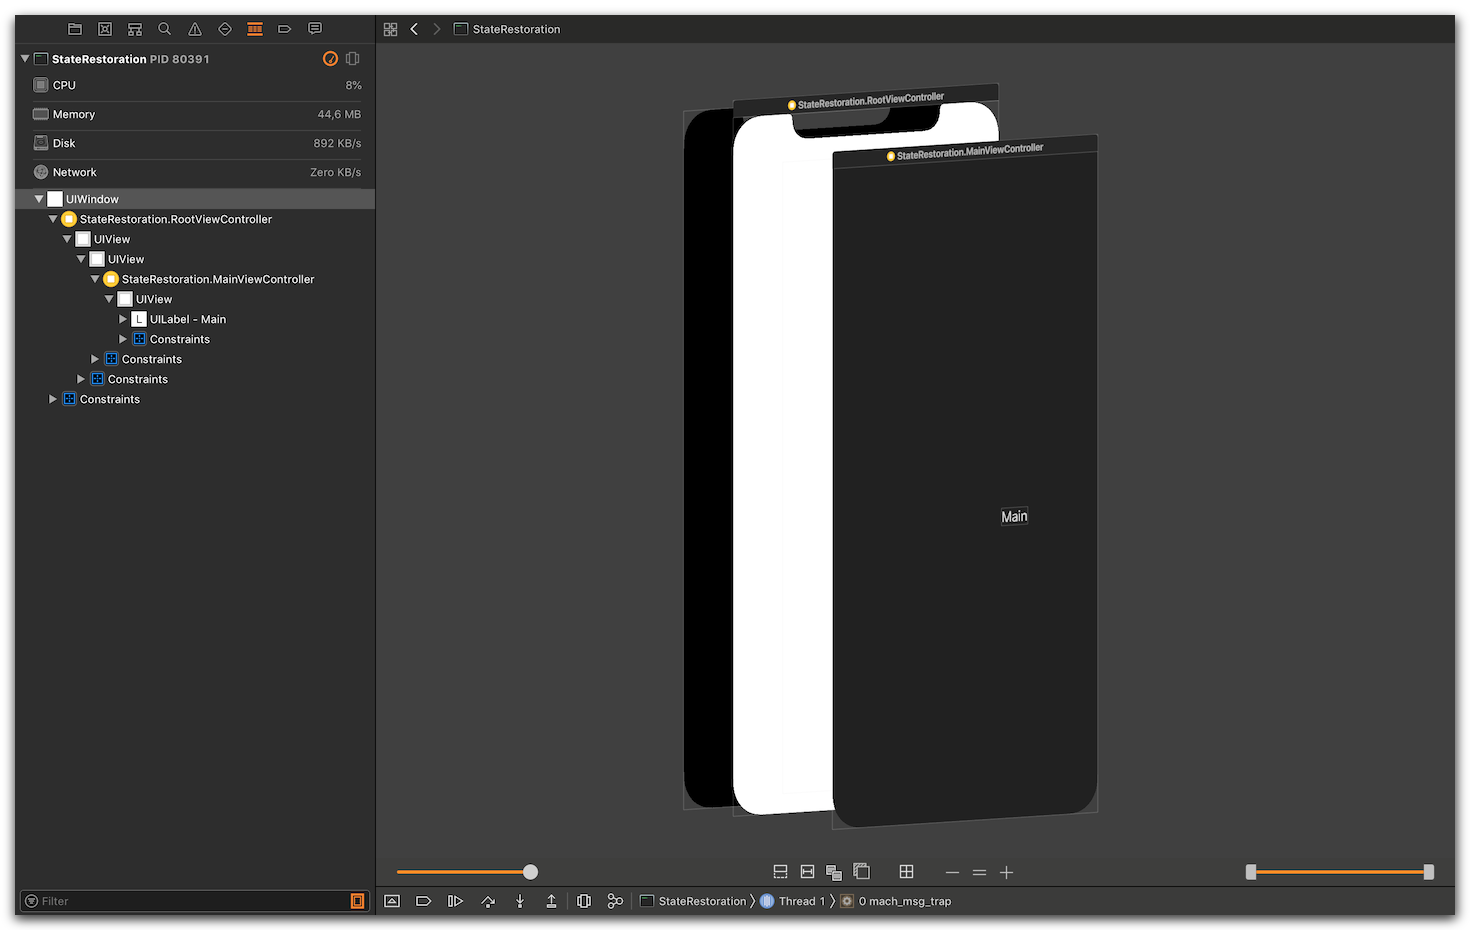
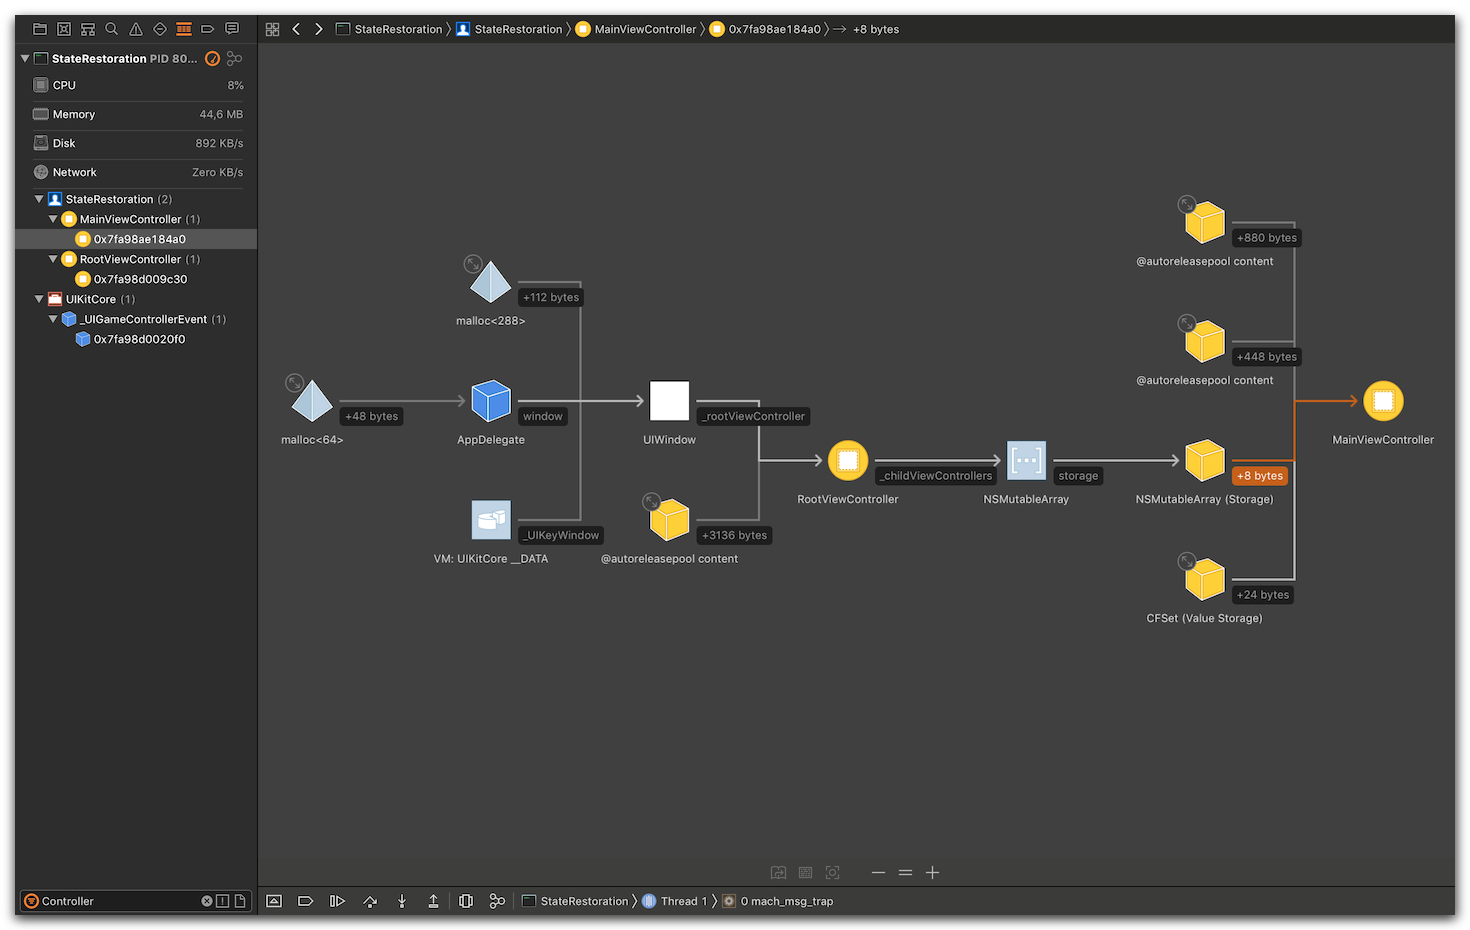
Considerations
Keep in mind that the user can, at any time, kill the app. At this point, the restoration process will not happen and the rootViewController will revert back to the one in the “Initial UI”. This will also happen if your app crashes.
ISTR that removing the app from the multitasking UI specifically disables state restoration, on the grounds that the user only does this when there’s something wrong with the app and thus it’s better to start from a clean slate. - Quinn “The Eskimo!”, Apple Developer Relations, Developer Technical Support, Core OS/Hardware
You should anticipate, embrace and gracefully handle your app reverting to its “Initial UI”.
As an example, in the case of a registration, it is possible that you store some authorization token to give access to the user. On startup, you can detect that and allow the user to login with the existing credentials.
One thing to consider is that if you decide to hardcode the decision as to what rootViewController to show, you effectively limit the choices you can give to a user to recover for a “bad state”. If the user cannot merely terminate the app, they will have to re-install.
Consider giving the user the ability to fallback in stages:
- While the user is using the app:
- to revert to a previous state; e.g. logout
- By removing the app from the multitasking UI:
- to remove any existing state, either through preservation or in memory; e.g. recover from a crash
- By un-installing:
- to erase any hard persisted data. e.g. an authorization token so as to start over.
Conclusion
tl;dr. You should use a Container View Controller as the rootViewController and swap one child UIViewController for another.
Should you wish to preserve the rootViewController, consider the native iOS support of preserving and restoring state.
Keep in mind that state preservation and restoration goes beyond what UIViewController is present. UIKit views can also have preservable state. As an example, a UIScrollView preserves its zoomScale, contentInset, and contentOffset properties, effectively “so that the content appears scrolled to the same position as before”.
That can be useful for persisting any registration steps as the user goes through, browses through a collection of photos or reads a long text.
I would like to thank @marc, @jsorge, @tekl of Seattle Xcoders for their input and for keeping me sane through this. Even though I am remote, Seattle Xcoders has welcomed me as if I am based in Seattle.
Shoutout to Andy. It may have taken 3 years but we did it!
One more thing
This is one of the many technical challenges that I am tackling as part of making Windmill on the iPhone the best experience it can be.
I have been busy working towards Windmill 3.0 which brings publishing of your apps during development.
You can download Windmill for free.-
Sample Project
github.com/qnoid/rootViewController
References
- Preserving Your App’s Visual Appearance Across Launches, App Programming Guide for iOS
- Preserving and Restoring State, View Controller Programming Guide for iOS
- Implementing a Container View Controller, View Controller Programming Guide for iOS
- UIViewController, Documentation > UIKit > View Controllers
Related
- Replacing the UIWindow’s rootViewController while using a transition, appears to be leaking
- Memory and CPU Profiling
- Strategies for Handling App State Transitions
- Technical Q&A QA1561, How do I programmatically quit my iOS application?
- Technical Note TN2298, Using Unwind Segues
- UIPresentationController, Documentation > UIKit > View Controllers